Wednesday, December 7, 2011

ACOT Challenges!


The monthly challenges are up at A Cherry On Top! They are full of inspiration and the possibility of some prizes (ACOT points). This is my first month being in charge of writing the article. I made a little mistake but nothing catastrophic. So check it out here!

and here is my challenge Trends and Techniques, that I just realized I have been hosting since.... September of 2009!! Can you believe that? I can't.

Anyway, this month I challenge you to use fabric on your layouts. Here is my example layout - which features Clearsnap, Pink Paislee and Fancy Pants along with a bunch of fun techniques. Usually I try to make a new layout for my challenge example, but this month with all the craziness of the holidays, I decided to use one that I already had. This is from my guest designer work for Clearsnap and you can read more about it on my original blog post.

Tuesday, December 6, 2011

The Nook Advent Calendar Giveaway


I'm so excited to share with you the Advent Calendar at My Scrapbook NookMyself and 24 other Nook friends are hosting a giveaway during the count down to Christmas. Every day untill Christmas one Nook girl will host a giveaway, so make sure you stop by and check out the Nook blog daily to see who is hosting a giveaway. And today is my day!

Here is a little bit of advent calendar inspiration for you. This is an advent calendar I created this year featuring Imaginisce Santa's Little Helper, SRM stickers, Twinery twine and a lot of felt and fabric glue.


Just a quick note about making this: it looks sewn together, but it's NOT! I sewed a border around the outside of the backing, just for some definition. I also stitched around the squares of patterned paper, but I adhered them to the squares of felt with fabric glue. The felt squares are also stuck to the backing with fabric glue. So, yes I can sew, but it was SO much easier to glue it together!

I die cut the scalloped circles, and used my cricut for the circles. I probably should have used the cricut for both - that would have saved time. Set it and forget it! I made the rosettes while I was watching tv.


Ok, now onto the part you are waiting for. Here is what I am giving away - 3 15yd bundles of Twinery twine, one Bo Bunny stamp pack, one WRMK stamp and one Imaginisce stamp. I reserve the right to throw a few more random things in there when I actually find an envelope and get it ready to mail. :)


For a chance to win this, simply leave a comment here before December 10th at midnight EST. I'll do a drawing and announce the winner next week. Make sure you also hop on over to Leah Killian's blog and get entered for the grand prize sometime between now and Christmas Morning. You could win a free subscription to the always inspiring Nook kits!

Sunday, December 4, 2011

Season to be jolly card


I have been thinking up cards for the Moxie Fab medallion challenge for a while now, and procrastinating. I guess it's lucky that I did, because I saw the new sketch challenge from My Mind's Eye and it was perfect!

Here is the card:
and here is the sketch.
I used the Holly Jolly papers from My Mind's Eye, some Twinery twine, an SRM sticker, American Crafts Cardstock and some favorite findings buttons. My camera has been acting up, so this picture isn't the greatest. Unfortunately I think I am going to have to take it into the shop tomorrow. Eek! hope that doesn't cost a small fortune. Anyway, the card is embossed with a sizzix embossing folder.

I haven't done this in a while, but I actually let myself have fun and play this weekend, so I indulged in a little old fashioned challenge combining...

Friday, December 2, 2011

Shed Sweet Light is up at Scrapbooking.com


my latest Scrapbooking.com article is up featuring a double page Hanukkah layout that I created last year.

Check it out HERE where you can see the full page in much better quality.
here is a little preview though - I just LOVE this photo!

Thursday, December 1, 2011

Scrapbook Nook Advent Calendar Giveaway


I'm so excited to share with you the Advent Calendar at My Scrapbook Nook. 24 Nook friends and I are hosting a giveaway during the count down to Christmas. Every day untill Christmas (starting today!!) 1 Nook girl will host a giveaway, so make sure you will check out the Nook blog daily to see who is hosting a giveaway. So have fun playing along! ps little hint: check back here on Dec 6 ;)

and here is a quick Christmas card for you. It's simple, but for some reason I just like it. This was one of the cards that I created in this year's ACOT crop Christmas card class. (Which I seem to be making a yearly thing of) It features some Prima North Country, and a SRM sticker.

Tuesday, November 22, 2011

A couple of fun little toots


This week this from my Scrapdango October reveal, featuring Little Yellow Bicycle Hello Fall, and some Jillibean Soup accents, is featured as the Facebook Profile pic over at Creating Keepsakes Facebook page.
Also, I don't think I ever shared these pages that I created a couple months ago. They were published in Scrapbook News and Review, so I couldn't share them. But now I can! These feature the Happy Camper collection from Imaginisce. These pictures are from our camping trip to Assateague Island. That reminds me, I never scrapped the photos of the wild horses. Will have to add that to my to-do list!

Saturday, November 19, 2011

Stamped Gift Set featuring Imaginisce and SRM

A couple of days ago I shared a stamping tutorial and promised some more ways to use those techniques. Embossing, glossy accents, crackle accents, flock, glitter and stickles can be combined with stamps to add that extra special touch. In the tutorial I used the stamps on cards and can I just say - wow my card making has come a long way in a year! The techniques are still useful though and here I used them on tags, a gift box, wrapping paper and gift wrap.

The gift box is from a printable template from Wendy Bird Designs at A Cherry On Top. These templates are awesome because they are so easy to use. You don't need any special software, just print them on the back side of the paper that you want to use, cut them out and fold on the fold lines. You can also add digital papers and print them out hybrid. Here I printed on the back of the Imaginisce Jingle All the Way paper, then added some punched kraft paper, a layered sticker accent and some ribbon.

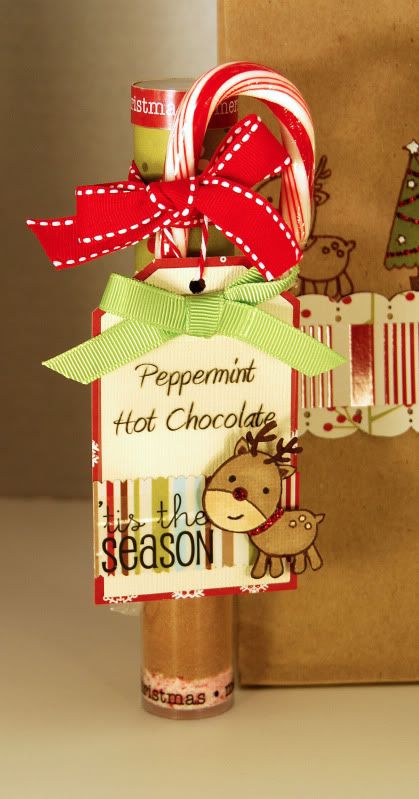
For the gift bag, I stamped a row of images with versamark ink. Then it wasnt dark enough for me, so I traced them with a fine brown pen. I colored in the one tree, just for interest, before adding the strip of papers and tying the top closed with a bow. The tag on this one has a reindeer with stickles on his nose and collar.

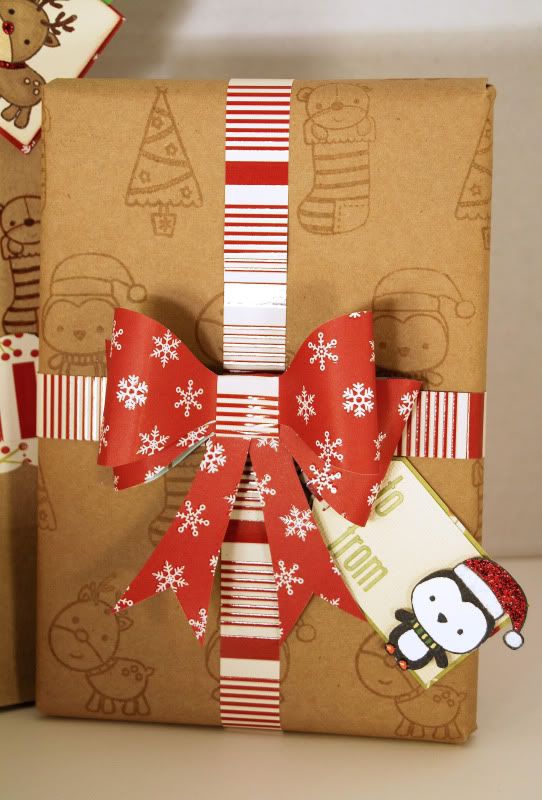
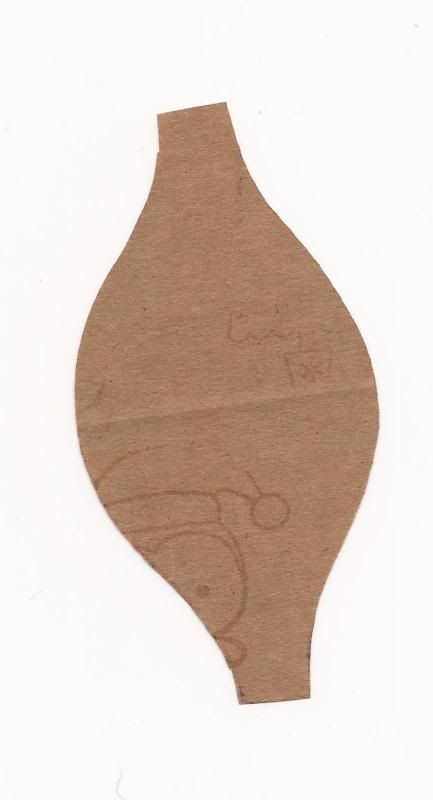
For the wrapping paper, I spread out the kraft wrapping paper and stamped the adorable little critters using versamark ink for a subtle effect. To make it easier, I arranged the 4 stamps on a large block, so I stamped all four at a time, and needed to repeat the pattern less often. Next I added some paper strips and a paper bow - who needs ribbon?! For the bow, I made a template for the loops, which you can see below. Then I copied it four times, and used glue dots to hold each loop together, and the two on each side to each other. Finally I used a strip of a contrasting paper to wrap around and hold all the loops together. The tails of the bow were just freehanded on some scrap paper. I used foam tape to adhere the bow to the package so that the bow didn't get too squished.

The penguin was stamped on white cardstock, then colored in. I then added stickles, glitter flock and glossy accents before fussy cutting it. I used more foam tape to adhere it to the tag. All the tags were cut with my Cricut. The letters are Lily Bee.

Last but not least, the tube is from SRM stickers. I filled it with layers of hot chocolate mix and crushed peppermint candies. I added some paper strips to the top, and stickers to the bottom and top. Then I added a candy cane and a ribbon, before tying on a tag. The tag features another SRM sticker, and a fussy cut Imaginisce stamped reindeer with a stickled nose and collar. Instructions are on the back of the tag.

Finally, here is the petal template for the bow. Yes, you can see the corner of a penguin stamp, this was a scrap that I had tested the stamp on, but all you really need is the outline.